 Last week we were so lucky to have 3 guest artist teachers come to Gabriel’s Art Kids after school program. All of which will become regular ‘guests’ since it was just SO much fun.
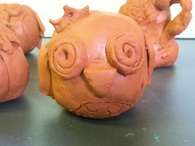
On Tuesday local pottery artist Ann Marie Cooper joined us to teach us all how to make clay rattles. We had the option of either an owl or pumpkin, though once the children got the hang of it, their imaginations took over and we ended up with elephants and various other animals. Normally I try to write about projects that parents can do at home with their kiddos and this is no different, however, you will need to use a self hardening clay or a sculpey or fimo that you can bake in your oven. Unless, of course, you own a kiln, then go for it! We used clay and Ann Marie was kind enough to take them with her for firing. We began by taking a small amount of clay, about the size of our palm, and splitting it into two pieces. Next we made each piece into a small ball and stuck our thumbs into the center to create a pinch pot. If you’ve never made a pinch pot before it’s quite fun, and once you make one you’ll want to make more. 1. Start with a ball of clay, about the size of your palm. 2. Roll clay in to a ball 3. Take your thumb and stick it into the center of the ball, push your thumb in to about the tip of your knuckle. (DO NOT POKE ALL THE WAY THROUGH) 4. Place your fingers on the outside of the ball (with thumb still submerged in the middle) and begin pinching the sides to widen the hole your thumb created. Spin the ball in your hand while pinching and creating a wider opening to the pinch pot, working the clay so that is thin enough to hold up the walls of the pot without flopping over. Be aware that your thumb isn’t too close to the bottom of the pot, however, you also don’t want a super thick bottom either. If you clay begins to crack (usually little hands are very warm and wick away the moisture in the clay quickly) have a small bowl of water near and using one to two fingers dip them into the water and rub onto your clay. REMEMBER you can always add more water if needed but to much to quickly will make your clay weak and unable to stand on it’s own. You’ll need to create 2 pinch pots relatively the same size as each other. Once both are done put them aside and take a small amount of clay and create 3 small balls, about the size of a pea, and wrap them in a small amount of newspaper (if firing, if not, no need for the paper). Now we need to put them together. The best way to do this is to score the tops of each pinch pot. To score in clay means to rough it up a bit, not like rough up as in beat up, though wedging clay is very similar to that and great in taking out some frustration. No, in this case, to score means to use a toothpick, old toothbrush, paperclip, pencil, etc and scratch tiny ridges into the edges of each pinch pot. Dip your finger in the water and run it around the area on the pinch pots that have been scored. Place the 3 balls in the center of a bowl and put the second pot on top (which also has been scored at its edges). Smooth the seam and take another piece of clay and roll it out into a coil (or snake) this coil should be long enough to wrap all the way around the connected pinch pots at the seam. Take the coil and wrap it around the seam, you can lightly tap on the coil to secure the bond and gently smooth it out until you can no longer see any seam. Now, comes the fun! Not that making the pinch pots wasn’t fun, but now we get to create our owls and pumpkins and really use our imagination. We can add leaves and stems to our pumpkins, we can carve out feathers and eyes and add beaks and wings for our owls, what ever you can think of you can do! Remember, whenever you attach clay to clay you will want to score the piece you are adding as well as the the place you will be connecting it to and add (a very small amount) of water. This acts as glue for clay and anything you attach will remain attached. If you do not do this, more than likely whatever you attach will fall off once the clay has dried. If you are using fimo or sculpey the scoring and water is not needed. When you are all finished sculpting, adding, carving and just creating your owl or pumpkin remember to take a safety pin, opened paper clip something that will puncture the rattle leaving only a tiny trace, and poke a small whole through one side or bottom of the rattle, this will allow the rattle to breathe and make it so your piece does not explode while being fired (or baked). Viola! You have a clay rattle! As long as you can imagine the creations are endless! 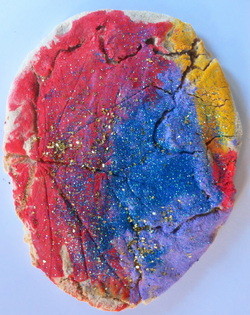 Last week at Gabriel's Art Kids we dove into and kneaded our way through salt dough. The children helped to mix the parts of salt, flour and water together to create their dough. We divided it into equal parts and flattened them into pancakes and away they went. The took all different types of leaves; maples, pine, hosta, and oak and pressed them into the pancake shaped salt dough. Some of the children choose to trace the outline of their leaf, while others cut their leaf shapes out.
Once the leaves were done I baked them at 200 degrees for a few hours, until they where hard and completely white. A higher temperature would have cooked them faster but would have also browned them. If you are going to completely paint the entire piece of dough the brown doesn't matter, however, I was unsure of what the little artists had in mind so I kept them white just in case. We used acrylic paint to add color to our baked dough and the children even found some glitter to add on top to give it that extra sparkle. I topped them with a clear acrylic matte varnish to give them a nice shine. I think they turned out fabulous! Ingredients 1 cup salt 2 cups all purpose flour 1 cup luke warm water Directions 1. In a large bowl mix salt and flour. 2. Gradually stir in water. Mix well until it forms a doughy consistency. 3. With your hands form a ball with your dough and kneed it for at least 5 minutes. The longer you kneed your dough the smoother it will be. Store your salt dough in a air tight container and you will be able to use it for days. You can paint your creations with acrylic paints and seal with varnish or polyurethane spray. You can let your salt dough creations air dry, however salt dough can also be dried in the oven. Bake at 200 F until your creation is dry. The amount of time needed to bake your creations depends on size and thickness; thin flat ornaments may only take 45-60 minutes, thicker creations can take 2-3 hours or more. You can increase your oven temperature to 350 F, your dough will dry faster but it may also brown, which won't matter if you are painting your entire creation (you can also cover your dough in the oven before it turns brown). There are a few options to color your salt dough: 1. Add powdered tempera paint to your flour, 2. add food coloring or paint to the water before you mix it with the salt/flour, or 3. add natural coloring like instant coffee, cocoa, or curry powder. |
ArchivesCategories |
 RSS Feed
LocationD st (Preschool & Pre-K/Kindergarten)
2215 D St, Bellingham WA 98225 Dupont St (Elementary Program)
1405 Dupont St, Bellingham WA 98225 |
|